Wiring CBX100 Input for a Barcode Teach Button
Barcode scanners are crucial tools in various industries, enhancing data capture and streamlining processes in manufacturing, retail, and logistics. The CBX100 interface box is a powerful device that supports the integration of barcode scanners by simplifying wiring, connectivity, and setup. A key feature of the CBX100 is its ability to interface with external triggers, such as a barcode teach button, which is vital for customizing scanner configurations. This process of Wiring CBX100 Input for a Barcode Teach Button allows users to optimize their scanners without complicated software adjustments.
What Is the CBX100 and How Does It Facilitate Barcode Scanning?
The CBX100 interface box is an adaptable connection unit designed to ease the integration of Datalogic barcode scanners with industrial equipment. It serves as a link between barcode scanners and external devices like PLCs, HMIs, and manual input devices such as teach buttons, enabling smoother interactions within automated systems.
Key Aspects of Wiring CBX100 Input for a Barcode Teach Button
Versatile Connectivity Options
The CBX100 offers a range of connection types, including RS232, RS485, and Ethernet, to cater to different operational needs.
Simplified Setup
The installation process is tool-free, thanks to snap-on connectors that allow for quick and efficient wiring without additional tools.
Enhanced Functionality
The device also supports external inputs and outputs, including the integration of features like the barcode teach button, enhancing overall flexibility.
The Function of the Barcode Teach Button
The barcode teach button streamlines the configuration process by allowing users to manually adjust key scanner settings, such as the type of barcode and the scanning range. This feature is particularly useful in environments where fast reconfigurations are necessary and software access is unavailable.
A Step-by-Step Guide to Wiring CBX100 Input for a Barcode Teach Button
Connecting the CBX100 to a barcode teach button involves wiring the button’s signal cables to the corresponding input pins on the CBX100. This setup ensures that when the button is pressed, it activates specific functions on the barcode scanner, like switching between preset settings.
Required Tools and Materials
Before starting the wiring process, ensure you have the following tools and materials:
Hardware Components:
- CBX100 interface box
- Barcode teach button
- Shielded wiring cables to reduce electrical interference
Tools:
- Phillips and flathead screwdrivers
- Wire strippers and cutters
- Multimeter to verify circuit continuity
Reference Materials:
- CBX100 user manual
- Teach button wiring diagram and specifications
Step 1: Preparing for the Wiring Process
Safety First
Always power down the CBX100 and any connected equipment to avoid potential electrical hazards. Additionally, wear insulated gloves when handling any electrical components to ensure safety. Work in a dry, clean environment to minimize the risk of short circuits.
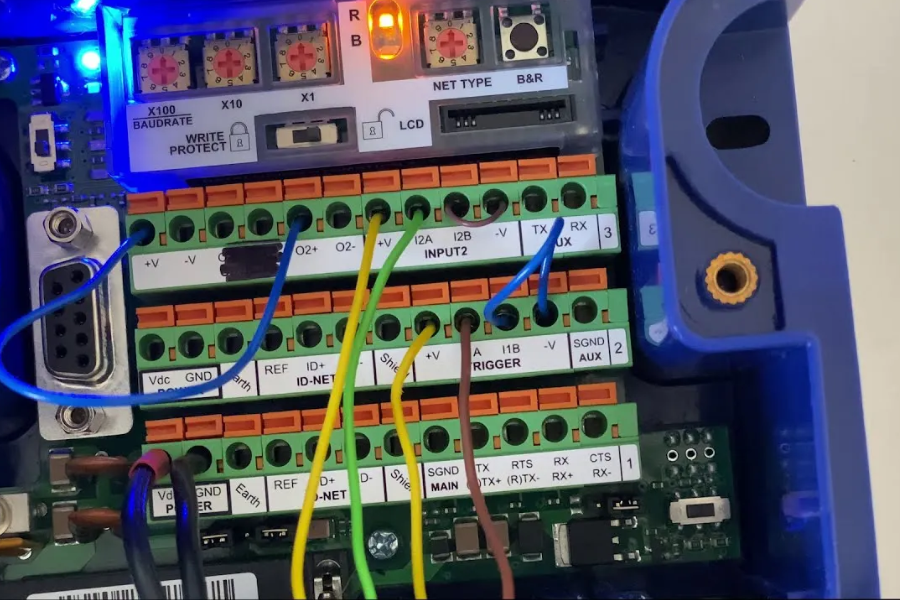
Understanding Input Pin Layout
The input ports on the CBX100 are clearly labeled, with specific designations for functions like GND (ground), IN1, IN2, and OUT. Identify the port intended for external triggers (such as IN1 or IN2) for the teach button connection.
Planning the Cable Routing
Plan the cable route to avoid clutter and reduce electromagnetic interference. Label each wire to help during the connection process and troubleshooting phase.
Step 2: Connect the Teach Button to the CBX100
1. Getting the Cables Ready
Carefully strip the insulation from the ends of the cables to reveal the conductor wires. Twist the exposed strands to ensure a solid and stable connection.
2. Securing the Wires to the Teach Button
Refer to the wiring diagram of the teach button to identify the correct signal and ground terminals. Secure the wires using the provided screws or clips to ensure a strong connection.
3. Linking the Wires to the CBX100 Input
Find the designated input port (e.g., IN1) on the CBX100 interface. Insert the signal wire into the correct input pin and securely tighten the connector. Then, attach the ground wire to the GND terminal.
4. Finalizing the Connections
Double-check that all connections are tight and secure, ensuring no exposed wires remain. Use cable ties to organize the wires, keeping them neat and preventing accidental disconnections.
Step 3: Powering On and Performing Initial Checks
1. Restoring Power to the System
Once everything is connected, turn on the power supply to the CBX100 and barcode scanner. Observe the LED indicators on the CBX100 to confirm that both power and input readiness are properly functioning.
2. Verifying the Functionality of the Teach Button
Press the teach button and observe the scanner’s response. Ensure that the scanner enters configuration mode or performs the pre-programmed action as expected.
3. Troubleshooting Common Issues
If the button does not trigger the expected response, verify the wiring connections and ensure the input pin is correctly assigned. Utilize a multimeter to check the continuity of the signal.
Step 4: Setting Up the Barcode Teach Button for Operation
After successfully wiring the teach button, it’s time to configure it for the desired function.
Accessing the Scanner’s Configuration Settings
You can access the scanner settings through its user interface or via the dedicated software tools. From there, map the input pin to the function you wish to trigger, such as enabling the teach mode.
Verifying the Configuration
Once the settings are in place, press the teach button to test the configuration. Ensure the scanner adjusts its parameters as intended.
Refining the Settings
If necessary, repeat the configuration process to fine-tune the scanner’s performance and ensure optimal results.
Addressing Common Issues During Installation
1. Troubles with Connections
Problem: The button does not activate the scanner. Solution: Inspect the wiring for any loose connections or ensure that the correct pins have been assigned.
2. Issues with Electrical Interference
Problem: The button causes erratic behavior when pressed. Solution: To resolve this, use shielded cables and confirm that the system is properly grounded to reduce interference.
3. Errors in Configuration
Problem: The button activates an incorrect function. Solution: Revisit the scanner’s settings and adjust the input mapping to ensure it corresponds to the intended action.
Advanced Functionalities and Customization Options
1. Setting Up Multiple Buttons
Add extra teach buttons to control different parameters of the scanner. Each button should be wired to a unique input pin, such as IN1 or IN2, to function independently.
2. Enabling Remote Control
Connect a wireless controller to the teach button to allow remote triggering. A relay module can be used to integrate the wireless system with the CBX100, offering greater flexibility.
3. Integrating with Automation Systems
Connect the CBX100 to a PLC for automated scanning adjustments in response to external signals. The barcode teach button can also serve as a manual override for the automated setup.
Best Practices for Maintenance
1. Routine Inspections
Regularly check the wiring to ensure connections are secure and cables haven’t been worn down. Replace any damaged cables immediately to prevent further issues.
2. Preventing Dust and Dirt Build-Up
To maintain optimal performance, keep both the CBX100 and teach button free from dust. If operating in a challenging environment, consider using protective covers to safeguard the system.
3. Keeping Proper Documentation
For easy reference in the future, maintain an up-to-date wiring diagram and configuration log to help troubleshoot or modify the system as needed.
Key Facts:
- Versatile Interface Box:
The CBX100 interface box simplifies the integration of barcode scanners with external devices like PLCs, HMIs, and teach buttons. It serves as a central hub for wiring and configuring the scanner setup.
- External Trigger Support:
One of the main features of the CBX100 is its ability to support external triggers, such as the barcode teach button. This feature allows for manual configuration of the scanner without requiring software changes.
- Multiple Connectivity Options:
The CBX100 supports a variety of connection types, including RS232, RS485, and Ethernet, making it adaptable for different industrial applications and environments.
- Tool-Free Installation:
The CBX100 is designed for easy setup, with snap-on connectors that allow for quick and tool-free wiring. This simplifies the process of Wiring CBX100 Input for a Barcode Teach Button, reducing setup time and effort.
- Configurable Input Pins:
The CBX100 provides input ports labeled for specific functions (e.g., IN1, IN2), which can be mapped to external triggers like the barcode teach button, enabling flexible control over scanner settings.
Final Thoughts on Wiring CBX100 Input for a Barcode Teach Button
The process of Wiring CBX100 Input for a Barcode Teach Button may seem simple, but it is a vital step in enhancing the functionality of barcode scanners. By following the guidelines in this manual, you will ensure that the wiring is done correctly, resulting in a stable and effective system. The integration of a teach button streamlines scanner configuration, which ultimately boosts operational efficiency in fast-paced environments.
As industries continue to evolve, tools like the CBX100 and barcode teach button are crucial for keeping systems adaptable and performing at their best. By embracing best practices and exploring advanced customization options, you can maximize the potential of your barcode scanning system, ensuring that it meets the growing demands of modern industrial operations.
FAQs:
1. What is the purpose of the barcode teach button with the CBX100 interface box?
The barcode teach button is used to manually adjust the scanner’s settings, such as barcode type or focus range, without needing to access the software. It simplifies the configuration process, especially in environments where rapid adjustments are necessary.
2. How do I wire the CBX100 input for a barcode teach button?
To wire the CBX100 input for a barcode teach button, you need to connect the button’s signal wires to the appropriate input ports on the CBX100 interface box (e.g., IN1 or IN2). Make sure to secure the connections properly and verify that the ground wire is attached to the GND terminal.
3. Can I use multiple teach buttons with the CBX100?
Yes, you can set up multiple teach buttons with the CBX100 by wiring each button to a separate input pin (such as IN1, IN2, etc.). This allows you to control different scanner parameters or trigger multiple actions simultaneously.
4. What tools are needed for Wiring CBX100 Input for a Barcode Teach Button?
The tools required include screwdrivers (flat and Phillips), wire strippers, wire cutters, and a multimeter to verify the continuity of the wiring. You will also need shielded cables for connecting the teach button to the CBX100.
5. How do I troubleshoot if the teach button is not working with the CBX100?
If the teach button isn’t working, first check for loose connections or incorrect pin assignments. Ensure the wires are securely connected and that the input pin is correctly mapped in the scanner’s configuration. You can also use a multimeter to test for continuity and correct signal flow.
Discover the latest news and updates on The Blog Verge